Dr. Tape Synth
Two oscillators, one filter and a little analog unrest.
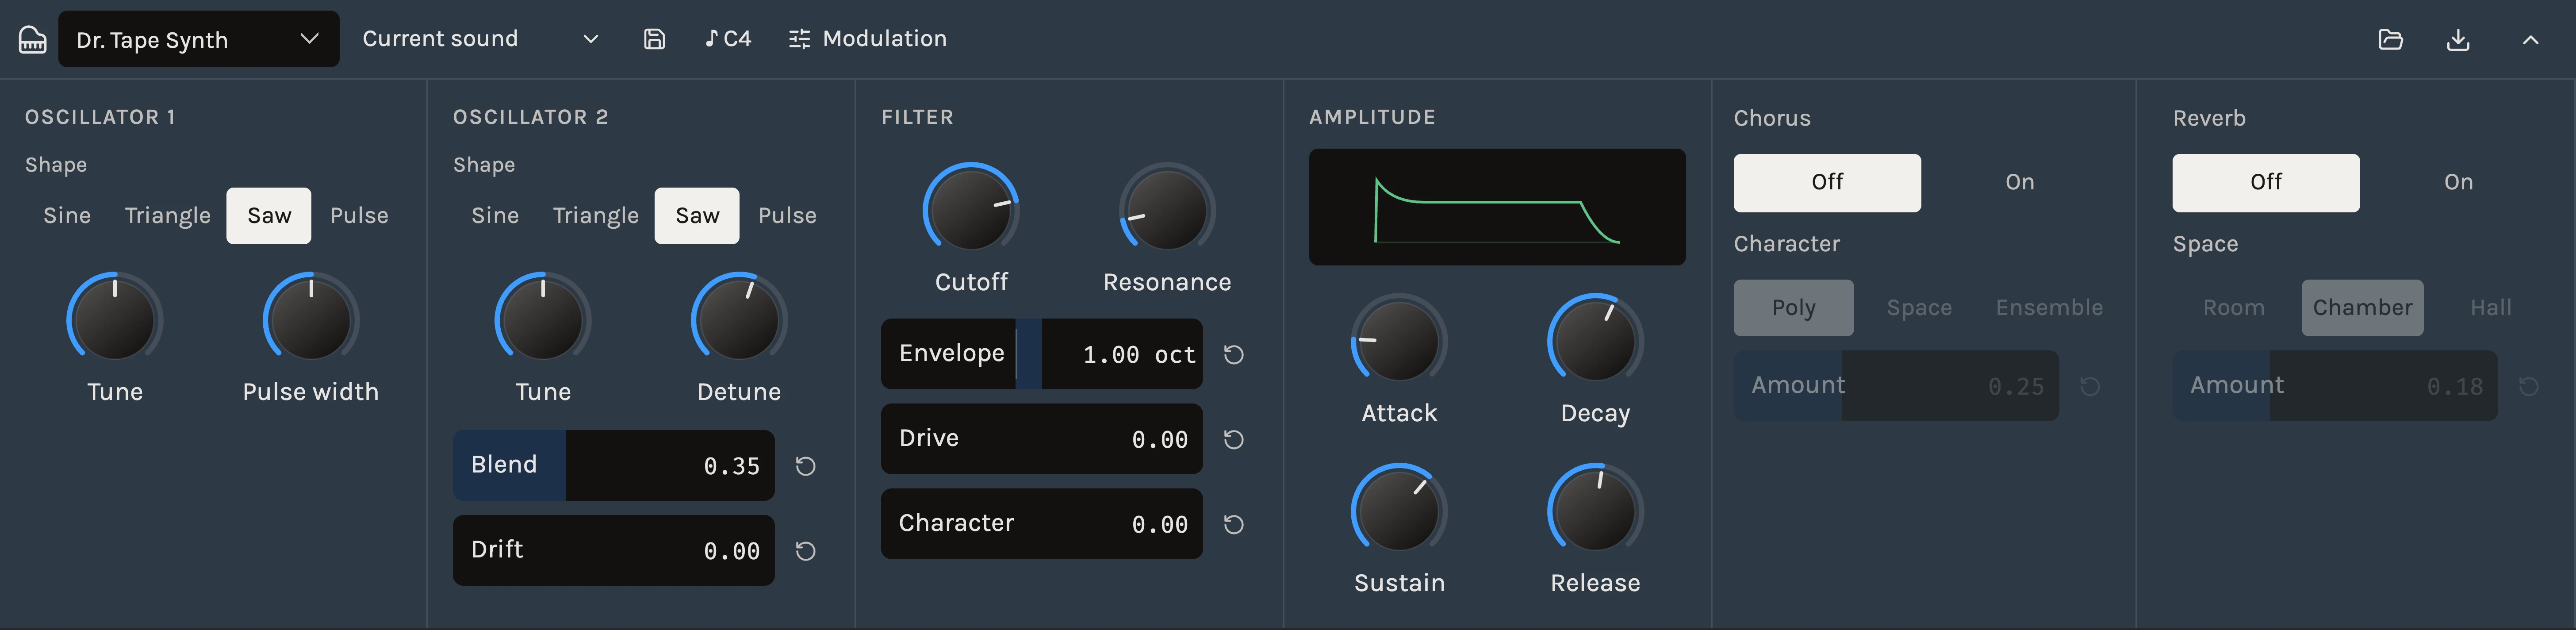
The Synth is the quick one: two oscillators into a resonant low-pass filter, two envelopes and a little motion. It is built for musical decisions that take seconds. Pick two shapes, set the filter, shape the attack, and you have a bass, a pad or a lead. Underneath, the oscillators can drift like old hardware, saturate into each other before the filter, and the filter can compress its own resonance, so the sound moves without a modulation matrix.
When to use it
Reach for it when you know the sound you want and want to get there fast: a round bass under a chord progression, a plucked chord part, a simple lead. The presets cover Bass, Pads, Keys, Plucks and Leads; Init is a plain sawtooth to build from. For morphing tables, phase modulation and deeper modulation, use the Wavetable.
Controls
Oscillator 1 and Oscillator 2
Each oscillator has a Shape (Sine, Triangle, Saw or Pulse) and Tune in semitones. Pulse width sets the width of both pulse oscillators. On the second oscillator, Detune fine-tunes it against the first in cents; the default 7 cents gives the familiar thickening. Blend balances the two. Drift adds slow, irregular tuning movement to both oscillators: 1 stays within about eight cents and feels like a warm instrument, 20 moves far enough to be atonal. Factory presets leave it at zero so you add exactly as much as you want.
Filter
Cutoff and Resonance are the main tone controls. Envelope sets how far the filter envelope opens the cutoff, in octaves; negative values close it. Drive saturates the two oscillators together before the filter and compensates the level, so you hear more harmonics, not just more volume. The knob’s travel is weighted toward the low end: half way is a gentle 0.5, and the hard settings sit in the last third. Character adds level-dependent resonance compression inside the filter. At zero the filter is clean. Raise Resonance to 3 or more, sweep Cutoff, and compare Character 0 and 0.5: the peak softens and gains harmonics.
Amplitude and Filter envelope
Two full Attack, Decay, Sustain and Release envelopes, one for loudness and one for the filter. For a pluck, give the filter envelope a short Decay and zero Sustain and set Envelope to two or three octaves.
Motion
One LFO with a Destination (pitch, filter or pulse width), a Rate and a Depth. Pitch moves up to a semitone, the filter up to two octaves, pulse width by ±0.3.
Voice
Voices chooses twelve-voice poly or last-note mono with Glide between notes. Output trims the level.
Chorus and Reverb
Both finish the sound inside the instrument so a patch is complete without the rack. Chorus offers Poly, Space and Ensemble characters; Reverb offers Room, Chamber and Hall spaces, each with an Amount. Both default off.
Tips
- Add Drift before Chorus. A few cents of movement between two oscillators does most of what people want from a chorus, and keeps the attack clear.
- For bass, put Oscillator 2 an octave down (Tune −12) with Blend near 0.3 and let Drive at 1 provide the growl rather than raising Resonance.
- Every knob here can carry an automation lane; see Instrument automation.
Control ranges
Oscillator 1
| Control | Range | What it does |
|---|---|---|
| Shape | sine · triangle · saw · pulse | |
| Tune | -24 to 24 st, starts at 0 st | |
| Pulse width | 0.1 to 0.9, starts at 0.5 | Width of both pulse oscillators. |
Oscillator 2
| Control | Range | What it does |
|---|---|---|
| Detune | -50 to 50 ct, starts at 7 ct | Fine tuning of oscillator two. |
| Blend | 0 to 1, starts at 0.35 | Balance between the two oscillators. |
| Drift | 0 to 20, starts at 0 | Slow, irregular tuning movement in both oscillators. 1 is ±8 cents; 20 reaches ±160 cents for strong, atonal movement. Detune still sets their average tuning difference. |
Filter
| Control | Range | What it does |
|---|---|---|
| Cutoff | 30 to 20000 Hz, starts at 5000 Hz | |
| Resonance | 0.5 to 8 Q, starts at 0.7 Q | |
| Envelope | -5 to 7 oct, starts at 1 oct | Filter envelope depth in octaves. |
| Drive | 0 to 4, starts at 0 | Saturate the two oscillators together before the filter, with automatic output compensation toward the clean level. 1 is the original drive; 4 pushes much harder. Tone can still affect perceived loudness. |
| Character | 0 to 1, starts at 0 | Level-dependent resonance compression inside the filter. Zero keeps the clean filter; higher settings soften strong resonant peaks and add harmonics. Try it with Resonance raised and sweep Cutoff. |
Amplitude
| Control | Range | What it does |
|---|---|---|
| Attack | 0.002 to 5 s, starts at 0.006 s | |
| Decay | 0.005 to 5 s, starts at 0.4 s | |
| Sustain | 0 to 1, starts at 0 | |
| Release | 0.005 to 8 s, starts at 0.2 s |
Motion
| Control | Range | What it does |
|---|---|---|
| Destination | pitch · filter · pulseWidth | Pitch: up to one semitone. Filter: up to two octaves. Pulse width: up to ±0.3. |
| Rate | 0.05 to 20 Hz, starts at 4 Hz | |
| Depth | 0 to 1, starts at 0 |
Voice
| Control | Range | What it does |
|---|---|---|
| Voices | poly · mono | Twelve voices, or last-note-priority mono with legato glide. |
| Glide | 0 to 1 s, starts at 0 s | Pitch transition time in mono mode. |
| Output | -36 to 0 dB, starts at -12 dB |
Chorus
| Control | Range | What it does |
|---|---|---|
| Chorus | Off · On | |
| Amount | 0 to 0.6, starts at 0.18 |
Reverb
| Control | Range | What it does |
|---|---|---|
| Reverb | Off · On | |
| Space | Room · Chamber · Hall |
11 factory presets.
See also
Changes
- FasterTape Synth playback uses less processing power · 3 October 2026
Tape Synth tracks use less processing power during playback, especially for chords with a clean filter. The sound, drift, drive, glide, finishing effects and loop transitions stay the same. Live controls keep their existing smoothing.